LaserMax Guide Rod Laser Problems: A Comprehensive Guide
Navigating issues with LaserMax guide rod lasers can be frustrating, as online resources sometimes face access restrictions due to security measures.
Troubleshooting often involves verifying power and addressing potential alignment concerns, as discussed in various forums and videos.
LaserMax revolutionized firearm accessory integration with its guide rod laser systems, offering a compact and effective aiming solution. These lasers replace the factory recoil spring guide rod, seamlessly incorporating a laser module into the pistol’s frame.
This design minimizes bulk and maintains a streamlined profile, appealing to users prioritizing concealability and quick target acquisition. However, this integration also presents unique challenges when troubleshooting malfunctions.
Online discussions, though sometimes hampered by website security protocols as seen on Reddit and YouTube, highlight common user experiences. These range from battery issues and activation failures to concerns about laser drift and accuracy. Understanding the intricacies of these systems, and potential points of failure, is crucial for owners seeking to diagnose and resolve problems independently.
The Illinois Carry forum demonstrates a community actively sharing experiences and solutions related to LaserMax products.
What is a Guide Rod Laser?
A guide rod laser is an integrated aiming system designed to replace the standard recoil spring guide rod within a semi-automatic pistol. Unlike external laser sights, it resides inside the frame, offering a lower profile and improved snag resistance. LaserMax pioneered this approach, creating a self-contained unit housing the laser diode, optics, and activation mechanism.
The system functions by utilizing the pistol’s recoil cycle to activate the laser; As the slide moves rearward, it engages a mechanism that momentarily powers on the laser, providing a visible aiming point. This internal placement minimizes the addition of weight or bulk to the firearm. However, this design also means troubleshooting can be more complex, requiring a degree of familiarity with the pistol’s internal components. Online resources, despite occasional access issues, confirm this integrated nature as both a benefit and a potential source of difficulty.
Popular LaserMax Models & Compatibility

LaserMax offers a range of guide rod lasers, with varying features and compatibility across different pistol platforms. Popular models include the UniMax, designed for broad compatibility with Glock pistols, and specific iterations tailored for Springfield XD, SIG Sauer, and Smith & Wesson models. Determining compatibility is crucial, as installing an incorrect unit can lead to malfunctions or damage.
The UniMax, for example, often appears in discussions regarding LaserMax issues, particularly concerning Glock firearms. Compatibility isn’t always universal within a brand; different Glock generations or sub-models may require specific LaserMax versions. Online forums highlight user experiences confirming this, emphasizing the importance of verifying the exact model number before purchase and installation. Accessing LaserMax’s compatibility charts directly is recommended, though website access can sometimes be problematic, as noted in recent reports.
Common LaserMax Guide Rod Laser Issues
Frequent problems include battery failures, activation difficulties, laser drift impacting accuracy, and potential moisture-related corrosion within the unit, hindering reliable performance.
Battery Problems & Solutions
Battery Issues are Prevalent: A common complaint with LaserMax guide rod lasers revolves around battery performance. Users frequently report unexpectedly short battery life or complete failure to power on. This can stem from several factors, including battery age, quality, and the type of battery used. LaserMax lasers typically utilize button-cell batteries, and ensuring these are fresh and correctly installed is paramount.
Troubleshooting Battery Concerns: Begin by verifying the battery’s polarity and ensuring a clean connection. Corrosion on the battery contacts can impede conductivity, so gentle cleaning with a cotton swab and isopropyl alcohol is recommended. If the laser still fails to activate, try a brand-new, high-quality battery from a reputable manufacturer. Avoid using generic or expired batteries, as they may not deliver sufficient power.
Preventative Measures: To prolong battery life, remove the battery when the laser is not in use for extended periods. Consider keeping a spare battery on hand for quick replacement during range sessions or critical situations. Regularly check the battery compartment for any signs of corrosion or damage.
Laser Sight Not Activating
Activation Issues: A frequent issue reported by LaserMax guide rod laser owners is the laser sight failing to activate, even with a fresh battery. This can manifest as a complete lack of laser emission or intermittent activation. Several factors can contribute to this problem, ranging from simple user error to more complex internal malfunctions.


Troubleshooting Steps: First, confirm the laser is properly installed and seated correctly within the firearm. Ensure the activation switch (typically integrated into the trigger guard) is being fully depressed. Check for any obstructions hindering the switch’s movement. If the issue persists, verify the firearm’s safety is disengaged, as some LaserMax systems are designed not to activate with the safety on.
Potential Internal Faults: If basic troubleshooting fails, an internal component may be faulty. This could involve a damaged switch, a broken wire, or a malfunctioning circuit board. In such cases, contacting LaserMax customer support or seeking professional gunsmith assistance is advisable.
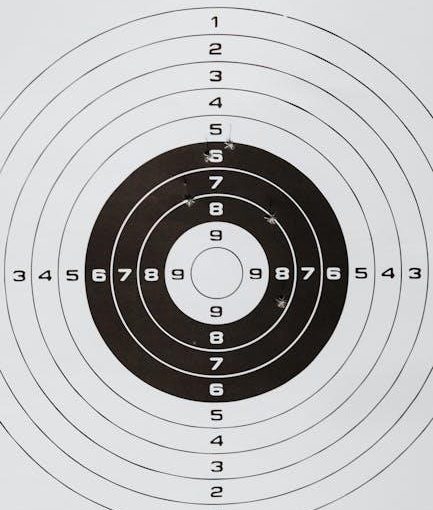
Laser Drift & Accuracy Concerns
Accuracy Issues: Users sometimes report LaserMax guide rod lasers exhibiting noticeable drift, meaning the laser dot deviates from the point of impact, compromising accuracy. This drift can be consistent (always shifting in the same direction) or random, making it difficult to compensate. Several factors can contribute to this frustrating problem.
Recoil & Alignment: Recoil is a primary suspect. Repeated firing can gradually loosen the laser’s mounting within the firearm, causing misalignment. Ensuring proper initial installation and periodically checking for looseness is crucial. Recoil impact can also subtly bend internal components, affecting laser alignment.
Bore Sight Verification: Regularly bore-sighting the laser is essential. This process confirms the laser dot aligns with the firearm’s bore. If drift is detected, re-tighten mounting screws or consider professional adjustment. Internal component wear or damage can also cause drift, necessitating repair or replacement.
Moisture Intrusion & Corrosion
Environmental Sensitivity: LaserMax guide rod lasers, while generally robust, can be vulnerable to moisture intrusion, leading to internal corrosion. Exposure to rain, humidity, or even sweat can compromise the laser’s delicate electronic components. Corrosion disrupts electrical conductivity, causing malfunctions like intermittent operation or complete failure.
Sealing & Protection: The effectiveness of the laser’s seals plays a critical role. Over time, these seals can degrade, allowing moisture to penetrate. Proper storage in a dry environment is paramount. Consider using a desiccant pack within the storage case to absorb excess moisture.
Corrosion Indicators: Visible signs of corrosion, such as white or greenish deposits on internal parts, indicate a problem. Attempting to operate a corroded laser can accelerate damage. Professional cleaning and inspection are recommended to assess the extent of corrosion and determine if repair is feasible. Prevention is key – regular cleaning and careful storage are vital.

Troubleshooting Steps
Begin with basic checks: battery functionality and proper activation. Cleaning and maintenance are crucial, alongside verifying recoil impact doesn’t affect laser alignment.
Caution is advised during disassembly.
Initial Checks: Battery & Activation
Battery Inspection: The first step in troubleshooting a LaserMax guide rod laser is a thorough battery check. Ensure the battery is correctly installed, observing proper polarity. Low battery power is a frequent cause of activation failures, so replacing the battery with a fresh one is recommended even if the existing battery shows some charge. Consider using high-quality batteries for optimal performance and longevity.
Activation Switch Test: Verify the activation switch is functioning correctly. Some LaserMax models utilize a momentary switch integrated into the trigger guard. Press and release the switch several times to confirm it’s making a solid connection. If the laser doesn’t activate, the switch itself may be faulty.
Clean Contacts: Inspect the battery contacts within the laser unit and on the battery itself. Corrosion or debris can impede electrical conductivity. Gently clean the contacts with a cotton swab lightly dampened with isopropyl alcohol. Ensure the alcohol evaporates completely before reinserting the battery.
Recoil Activation Check: For models designed to activate with recoil, manually cycle the slide (with an empty firearm, following all safety protocols) to see if the laser activates consistently. Inconsistent activation suggests a potential issue with the recoil-sensing mechanism.
Cleaning & Maintenance Procedures
External Cleaning: Regularly clean the exterior of your LaserMax guide rod laser with a soft, dry cloth to remove dust, dirt, and fingerprints. Avoid abrasive cleaners or solvents, as these can damage the finish. A slightly damp cloth (with water only) can be used for stubborn grime, followed by thorough drying.
Lens Cleaning: The laser lens is critical for accuracy. Clean it carefully with a lens cleaning kit specifically designed for optics. Avoid touching the lens directly with your fingers. Use a lens brush to remove loose particles before applying lens cleaning fluid.
Internal Inspection (Limited): While extensive disassembly is discouraged, periodically inspect the visible internal components for signs of corrosion or debris. Use a small flashlight to illuminate the interior.
Lubrication: Apply a small amount of quality gun lubricant to the guide rod and any moving parts, as recommended by LaserMax. Avoid over-lubrication, as this can attract dirt and debris. Proper lubrication ensures smooth operation and prevents wear.
Recoil Impact & Laser Alignment
Recoil Effects: Repeated firing subjects the LaserMax guide rod laser to significant recoil forces. This can gradually shift the laser’s alignment, impacting accuracy. Regular checks are crucial, especially after extensive range time or modifications to the firearm;
Alignment Verification: After cleaning or re-installation, verify laser alignment at a safe distance (e.g., 25 yards) using a target. Observe where the laser intersects with the bullet impact point. Adjust as needed, following LaserMax’s instructions.
Tightening & Security: Ensure all screws and retention mechanisms are properly tightened. Loose components contribute to alignment drift. Periodically inspect these fasteners for signs of loosening or damage.
Impact of Modifications: Any changes to the firearm – such as replacing parts or altering grips – can affect laser alignment. Re-check and adjust the laser after any modifications. Consistent recoil management is key to maintaining accuracy.
Disassembly & Inspection (Caution Advised)
Proceed with Extreme Caution: Disassembling a LaserMax guide rod laser is generally not recommended unless you possess significant firearms experience and a thorough understanding of the unit’s internal components. Incorrect disassembly can cause irreparable damage and void any warranty.
Internal Inspection: If disassembly is attempted, carefully inspect all internal parts for signs of corrosion, damage, or loose connections. Pay close attention to the laser diode, wiring, and battery contacts.
Corrosion Concerns: Moisture intrusion can lead to corrosion, affecting electrical conductivity and laser performance. Clean any corrosion with a specialized electrical contact cleaner.
Professional Recommendation: Due to the complexity and potential risks, it’s strongly advised to seek professional gunsmith assistance for any internal repairs or inspections. Avoid forcing any components during disassembly or reassembly.
Specific Problem Scenarios & Fixes
Common issues vary by firearm model, with Glock and Springfield XD lasers frequently discussed online. Troubleshooting often involves battery checks and ensuring proper recoil impact alignment.
LaserMax on Glock: Common Issues
LaserMax guide rod lasers installed on Glock pistols frequently encounter specific problems, often centering around reliable activation and maintaining zero after repeated firing. Users on platforms like Reddit have reported instances of the laser intermittently failing to engage, particularly after magazine changes or during rapid-fire sequences. This can stem from a loose battery connection or a compromised switch mechanism within the guide rod assembly.
Another prevalent issue involves laser drift, where the point of aim shifts over time, impacting accuracy. This is often attributed to recoil impacting the laser diode housing, causing it to subtly move out of alignment. Proper installation, ensuring a snug fit within the Glock’s frame, is crucial. Furthermore, some users have experienced difficulties accessing LaserMax support due to network security blocks, hindering their ability to obtain direct assistance.
Addressing these concerns often requires careful inspection of the battery compartment, cleaning contact points, and verifying the laser’s alignment using a bore sight. It’s important to note that attempting disassembly without proper knowledge can void warranties and potentially damage the unit.
LaserMax on Springfield XD: Specific Concerns
When integrating LaserMax guide rod lasers with Springfield XD pistols, owners often face unique challenges compared to Glock installations. A recurring theme in online discussions revolves around compatibility issues with certain XD models and variations in frame tolerances. This can lead to a less secure fit for the laser unit, increasing the likelihood of movement and subsequent loss of zero.
Users have reported that the Springfield XD’s recoil spring system can exert more force on the guide rod assembly, potentially accelerating wear and tear on the laser diode and its housing. This can manifest as intermittent laser activation or a gradual shift in the laser’s point of impact. Battery life also appears to be a concern for some XD owners, with reports of faster battery drain than experienced with Glock setups.
Troubleshooting typically involves meticulous inspection of the guide rod’s fit, ensuring it’s fully seated and doesn’t exhibit excessive play. Regular cleaning and careful battery management are also recommended to mitigate these specific concerns.
LaserMax on SIG Sauer: Troubleshooting
Integrating LaserMax guide rod lasers into SIG Sauer pistols presents distinct troubleshooting considerations. SIG Sauer’s diverse range of models, each with varying frame designs and recoil spring systems, necessitates a tailored approach to problem-solving. A common issue reported by users involves difficulty achieving consistent laser alignment due to the SIG’s often tighter tolerances.
Unlike Glock or Springfield XD platforms, SIG Sauer pistols may require more precise fitting of the LaserMax unit to ensure proper function and minimize laser drift. Owners frequently discuss the importance of verifying the guide rod’s full engagement within the frame and checking for any interference with the recoil spring assembly. Battery contacts can also be a source of trouble, requiring careful cleaning to maintain a reliable connection.

When encountering issues, SIG Sauer owners should prioritize a thorough inspection of the laser’s mounting points and consider professional gunsmith assistance for adjustments.
Advanced Troubleshooting & Repair
When initial steps fail, contacting LaserMax support or a qualified gunsmith is crucial. Complex repairs or replacements should be handled by professionals for optimal results.
Contacting LaserMax Customer Support
Reaching out to LaserMax directly is a vital step when facing persistent issues with your guide rod laser; Their official website provides various avenues for support, including a dedicated contact form and potentially a phone number for direct assistance. Be prepared to provide detailed information about your specific LaserMax model, the firearm it’s installed on, and a comprehensive description of the problem you’re experiencing.

Documenting the issue with photos or videos can significantly expedite the troubleshooting process. Include details about when the problem started, any recent changes made to the firearm or laser, and any steps you’ve already taken to resolve it. LaserMax support representatives may ask about the date of purchase and proof of ownership.
Keep a record of all communication with LaserMax, including dates, times, representative names, and any case or ticket numbers assigned to your issue. This documentation will be invaluable if further follow-up is required. While online forums can offer helpful suggestions, official support from the manufacturer is often the most reliable path to a resolution, especially for complex technical problems.
Professional Gunsmith Assistance
When troubleshooting LaserMax guide rod laser problems extends beyond basic steps, seeking a qualified gunsmith is a prudent decision. A skilled gunsmith possesses the expertise to diagnose intricate issues, particularly those involving firearm disassembly, alignment, and potential modifications required for proper laser function.
They can accurately assess whether the problem lies with the laser itself, the firearm’s mechanics, or the interaction between the two. A gunsmith can also perform precise laser alignment, ensuring optimal accuracy and minimizing drift. It’s crucial to choose a gunsmith experienced with LaserMax products and familiar with the specific firearm model.
Be upfront about all previous troubleshooting attempts. Professional repair may involve specialized tools and techniques, and attempting complex repairs without proper training can lead to further damage or safety hazards. A gunsmith can provide a clear assessment of repair costs versus replacement options, offering informed guidance for a lasting solution.
DIY Repair vs. Replacement
Deciding between a do-it-yourself (DIY) repair and outright replacement of a malfunctioning LaserMax guide rod laser requires careful consideration. While some issues, like battery replacement or external cleaning, are easily handled by the owner, more complex problems demand professional attention.
Attempting disassembly beyond basic maintenance can void warranties and potentially damage the laser or firearm. Online resources, while helpful, may not provide complete or accurate guidance for every situation. The risk of misdiagnosis and improper reassembly is significant.
Evaluate the cost of potential repairs versus the price of a new unit. If the laser is older or the repair estimate is substantial, replacement may be the more economical and reliable option. Factor in the value of your time and the potential for further complications with a DIY attempt. Prioritize safety and accuracy when making your decision.
Preventative Measures & Long-Term Care
Consistent cleaning, proper storage in a dry environment, and timely battery replacements are crucial for extending the lifespan and maintaining the accuracy of your LaserMax.
Proper Storage & Handling
Maintaining your LaserMax guide rod laser requires diligent attention to storage and handling practices. When not in use, always remove the battery to prevent potential corrosion from leakage, a common issue reported by users. Store the laser in a cool, dry place, shielded from extreme temperatures and humidity;
Avoid dropping or subjecting the firearm, and consequently the laser, to significant impacts, as this can disrupt internal alignment and affect accuracy. When cleaning your firearm, take extra care around the laser module; avoid direct spraying of cleaning solvents. Instead, gently wipe the exterior with a soft, dry cloth;
Consider using a protective case or holster specifically designed for firearms with mounted lasers. This will safeguard against accidental damage during transport or storage. Regular inspection for any signs of physical stress or corrosion is also recommended. Proper handling minimizes the risk of malfunctions and ensures long-term reliability.
Regular Cleaning Schedule

Establishing a consistent cleaning schedule is crucial for the longevity of your LaserMax guide rod laser. A monthly inspection should be standard, focusing on the laser aperture and surrounding areas. Use a soft, lint-free cloth to gently remove dust, debris, and fingerprints. Avoid abrasive cleaners or solvents, as these can damage the laser diode or protective coatings.
During firearm cleaning, carefully shield the laser module from direct contact with solvents. Any solvent spillage should be immediately wiped away. Periodically, inspect the battery compartment for signs of corrosion. If present, carefully clean with a cotton swab dipped in isopropyl alcohol, ensuring the area is completely dry before reinserting the battery.
A thorough cleaning every six months, including a careful check of the mounting screws, will help maintain optimal performance and accuracy. Consistent cleaning prevents build-up that can interfere with laser projection and overall functionality.
Battery Replacement Best Practices
Maintaining optimal battery performance is vital for your LaserMax guide rod laser. Always use the battery type specified by LaserMax – typically button cell batteries. Avoid mixing old and new batteries, and always replace batteries as a set for consistent power output. Before installation, inspect the battery contacts for corrosion; clean with a cotton swab and isopropyl alcohol if necessary.
When replacing batteries, ensure correct polarity (+/-) alignment. Incorrect insertion can damage the laser module; It’s advisable to carry spare batteries, especially during extended range sessions. Remove batteries if the laser will be stored for prolonged periods to prevent potential leakage and corrosion.
Dispose of used batteries responsibly, following local regulations. Regularly checking battery levels and proactively replacing them prevents unexpected laser failures during critical moments, ensuring reliable performance.